Cheques are a type of payment that allow individuals or businesses to transfer funds from one account to another. Some people use cheques to pay bills.
For example, a person who receives a bill in the mail could write a cheque for the amount owed and mail it back to the company. Cheques are also used for paying rent, making large purchases, or paying someone for services rendered.
Cheques are a convenient payment method. They provide a record of your transaction, which can be helpful for tracking expenses or resolving disputes. They provide a secure way to pay, as they require a signature and can be cancelled if lost or stolen.
If you’re new to using cheques, you may wonder how to write one. In this guide, we’ll cover the six simple steps you’ll need to write a cheque in Canada.
How to Write a Cheque in Canada
The process for writing a cheque with TD, BMO, RBC, or HSBC in Canada varies slightly depending on the financial institution. Here are some general directions for writing a cheque.

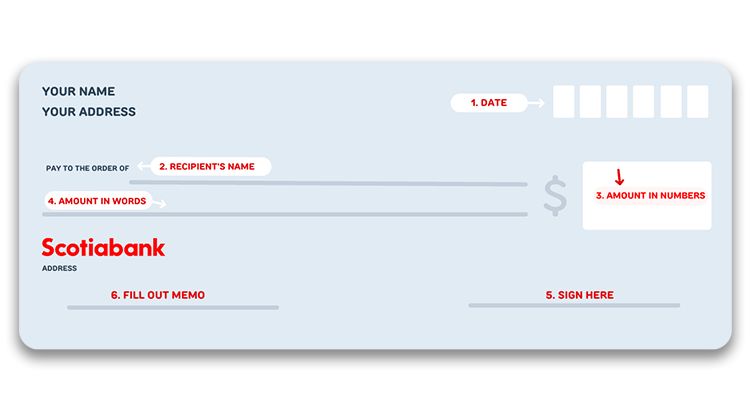
Step 1: Write the Date
On the top right corner of the cheque, write the current date in the format of day, month, and year. For example, on February 7, 2024, you would write the date as 07-02-2024.
Step 2: Write the Recipient
On the “Pay to the Order of” line, write the name of the person or business you are paying. This line should be legible and clear to ensure the money gets to the right person.
Step 3: Write the Payment Amount in Numbers
In the box on the right side of the cheque, write the amount of money you are paying in numbers. Make sure to include both dollars and cents, and double-check the amount before you use the check.
It’s important to ensure the decimal point is visible – you don’t want a few extra zeros added to your payment amount.
Step 4: Write the Payment Amount in Words
Below the “Pay to the Order of” line, write the cheque’s amount in words. This should match the amount written in numbers. For example, $414.39 written out equals four hundred fourteen dollars and 39/100.
When including cents, draw a line from the last written number to the end of the line and write the cents as a fraction (e.g., 39/100). Don’t leave space for anyone to add additional digits to your cheque’s amount.
Step 5: Sign the Cheque
On the bottom right corner of the cheque, add your signature. This signature should match the one on file with your bank. You’ll want to sign your name legibly using script.
Step 6: Write a Memo
On the line below the signature, describe the purpose of the cheque. This is optional but can be helpful for record-keeping. For example, if you’re writing a cheque to cover veterinary care for your dog, you may write a brief memo like “Vet Care.”
What Do the Numbers on a Cheque Mean?
The numbers on a cheque serve several important purposes. Here’s an overview of what the numbers on a cheque mean in Canada:
Bank Routing Number: The first set of numbers, usually found on the bottom left of the cheque, is the bank routing number. The bank routing number identifies the payer’s financial institution.
Account Number: The next set of numbers, directly next to the bank routing number, is the account number. The account number identifies the payer’s bank account.
Cheque Number: The final set of numbers, usually found on the top right of the cheque, is the cheque number. The financial institution assigns this number to track the cheque.
Pros and Cons of Using Cheques
Using cheques has both advantages and disadvantages. Here are some pros and cons of using cheques:
Pros
Security: Cheques provide a secure way to transfer funds as they require a signature and can be cancelled if lost or stolen.
Record Keeping: Cheques provide a physical transaction record, which can be helpful for tracking expenses or resolving disputes.
Cons
Processing Time: Cheques can take several days to clear and be processed, making them a slower option than electronic transfers or other forms of payment.
Paper-based: Cheques are paper-based and can be easily lost or damaged.
Limited Use: Some businesses or individuals may not accept cheques as payment, limiting their use in certain situations.
Cost: There may be fees associated with using cheques, such as fees for printing or stop payment orders.
Although cheques come with benefits and drawbacks, the choice of whether to use cheques depends on an individual’s or business’s needs and preferences.
FAQs
What should you not write on a cheque?
Do not write personal or confidential information on a cheque, such as your social insurance or driver’s license number. Avoid writing anything that could compromise the security of the cheque or your bank account.
What happens if you write a cheque wrong?
If a mistake is made on a cheque, it can be returned or delayed by the financial institution, resulting in delayed payment. To avoid this, it’s important to double-check all information on the cheque before signing it.
Can you make a mistake on a cheque?
If you make a mistake, void the check by writing void in all capital letters across the entire check. To avoid this, take your time writing a cheque and double-checking all information before signing.
Who signs the back of a cheque?
The person who receives the cheque typically signs the back. This signature should match the signature on file with the financial institution.
Related


